Jun just travelled again! This time, congrats to faithful to Jesus in Kentucky on her new Jun adoption!
What is Jun? It is a fermentation culture, very similar to Kombucha, that you make with honey instead of sugar. I DON’T recommend ever using honey with your Kombucha SCOBY or with tibicos— honey contains lots of complicated stuff that can contaminate and kill your culture. Somehow, Jun gets around this problem. I figure she must be extra resilient to deal with the honey in the first place– surely the resulting SCOBYs are thick and robust, she seems to travel quite well, and the brew forms faster than kombucha.
In honor of fermenting with honey, I want to present one of my lastest batches of brew. This one is a wild fermentation, which means no SCOBY is needed. Wild fermentation depends on harvesting the yeasts that are already present in the surrounding air. This is the third year in a row I have made a wild style mead. My recipe is an adaptation on the “T’ej” recipe in Sandor Katz’s book, Wild Fermenation.
Wild Mead Recipe
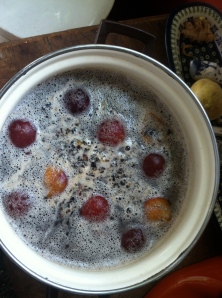
In a large pot, combine 1 part raw honey to 4 parts water. The honey to water ratio is not set in stone: alter it to your taste. I tend to start with a gallon of liquid. Stir the mixture until it is homogenous– ala the honey has been dissolved into the water. Let the mixture sit for a week or two, stirring it well a couple times per day. After a few days, the mixture will start to bubble. To help get the bubbling going and to flavor your brew, you can add fruit to the mix also. Fruit tends to have some yeast coating on it, so the fruit serves as an extra way to innoculate the batch. To my latest batch, shown below, I added apricots and dried hibiscus.
Other flavorings I’ve tried have been:
1. nothing– just plain honey
2. strawberries
3. blackberries and sage leaves
Once it is bubbling super vigorously, you can decide when it is time to remove the fruit. You can leave the fruit for up to a week. When the bubbling starts to slow down a bit, it’s time for the secondary fermentation process— I left my last brew for two weeks. At this point, you can try the wine as it is: young mead is yummy, too!
Secondary fermentation: Strain your brew as you put it into a carboy with an airlock. A carboy is a narrow- necked bottle that’s just the right size to contain your liquid. You can buy airlocks for a couple bucks from a brew-making supply store, of which there are many online. I get mine from Brooklyn Kitchen.
If you don’t want to go out and get an airlock, a balloon set over the opening will do: you just have to keep an eye on the balloon: when it starts to fill with gas, it will need to be burped. Apparently, my grandmother used to make wine this way. She would keep it in a carboy in the bathtub, in case the fermentation got so fizzy that the brew bubbled over and made a mess. Because of her balloon airlock, the resulting wine was always referred to as “balloon wine” in my family.
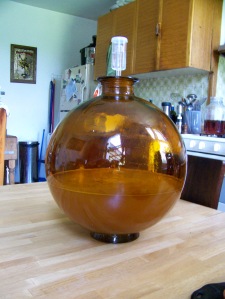
This picture shows the first bottle I used as a carboy. I found this beautiful bottle at a discount store in the neighborhood, and I couldn’t resist using it. The bottle came with a cork stopper that I screwed a hole through to insert the airlock. What I did not realize at the time is that you are really supposed to fill any carboy up to the neck so as to minimize the liquid’s exposure to air. That’s the whole point of the carboy! Luckily, fermentation is a forgiving enough process that I still came out with something worth drinking. This carboy was so large that I haven’t used it lately, since I don’t tend to make batches so huge: I now stick to a gallon sized glass apple cider bottle.

The pretty, but too large, carboy. It’s probably 5 gallons +. For this batch, I even added extra honey and water to fill the bottle more after my initial fermentation.
Once you have strained your slightly bubbling mixture into the carboy and set the airlock, let it sit for about a month. At first, you will still see a generous amount of bubbles. By the end of the month, not so many. When bubbles have visibly subsided, it’s time to bottle the brew! Collect screw top wine bottles in preparation of this step, or buy some stopper bottles, or get a corker and your own corks.
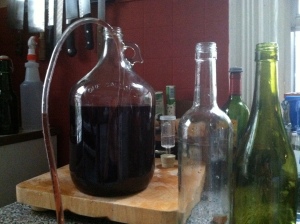
The best way to bottle your mead is by siphoning: a process they call “racking.” Siphoning the mead aerates it and gets rid of excess sediment. I bought some plastic tubing from my nearby pet store in the aquarium section to use for this process. Position the carboy up higher, like on a table, and your bottles down lower, like on the floor. Put one end of your tubing in the full carboy, not touching the silt that’s formed at the bottom of the bottle, and use your mouth to suck the liquid into the tubing. Once the brew starts to flow, quickly put the end of the tube into your empty bottles. Pinch the tube or cover it with your finger as you transfer to the next bottle. Be prepared to make a bit of a mess. Finally, seal your bottles.

My racking siphon setup. I took this photo awkwardly during the process, while I was hunched over filling bottles on the floor. Note, this is not my mead, but another brew I’ve yet to write about, blackberry wine. Stay tuned for that one!
Warning: If you have not let the brew ferment long enough before bottling, you could be in for a bit of a surprise. Last year after I bottled my blackberry-sage batch, I mysteriously found my corks on the floor two days later! Pressure had built up in the bottles from the air created by the still bubbling brew, and the pressure was large enough to eject the corks. Oops!
Each batch of mead I have made has been unique. This is part of the adventure of a wild fermentation: you are subject to the whims of the airborne yeasts in your brew-place. Temperature certainly also plays a vital role, and since my kitchen is never air-conditioned, my temperatures have varied considerably. If you find that once you’ve bottled a batch it’s still cloyingly sweet, you may want to let the brew age. That happened with my strawberry batch: it was very disappointing. After my first bottle, I left the rest of the bottles in the back of the closet and forgot about them for most of a year. When I came back to them: surprise! The aging process had created a wonderful wine!


Do you cover your mead for the first ferment? 🙂
The first ferment is aerobic, and also part of it is that you are trying to attract the wild yeasts to the honey. This is partly why stirring it is important. So, you will need some sort of covering to keep out fruit flies and dust, but not something airtight. I use the lid on my pot which is not airtight, but you could also use a towel.
Hi, I’m a little shocked at the ratio of honey to water. Is that correct? So I would combine 4 cups of honey for 1 cup of water? I hope I have time to make this before Christmas! It sounds so delicious…
Whoa, Claudia, I’m glad you caught my misprint! It’s the other way around– 1 cup of honey to 4 cups of water! I’m fixing that right now. It is delicious. I’m sure you could make a honey wine with the other ratio I listed, but it would be a very different product. I’m changing it in the article right now. -Adele, the Brooklyn Alewife
Hello…. I am passionately seeking a Jun mother… are you able to share yours? Please let me know if you do still have it going. Thank you. Joy joy@eatingwithjoy.com